domenica 29 ottobre 2017

26 Great Nail Art Ideas: Halloween Spider with Negative Space

 Halloween Spider with Negative Space
** Testo in italiano in fondo alla pagina **

Today theme for 26 Great Nail Art Ideas is Halloween nail art with negative space.

 Halloween Spider with Negative Space
 
If you are looking for some Halloween ideas you can find some at this link, including costume ideas!

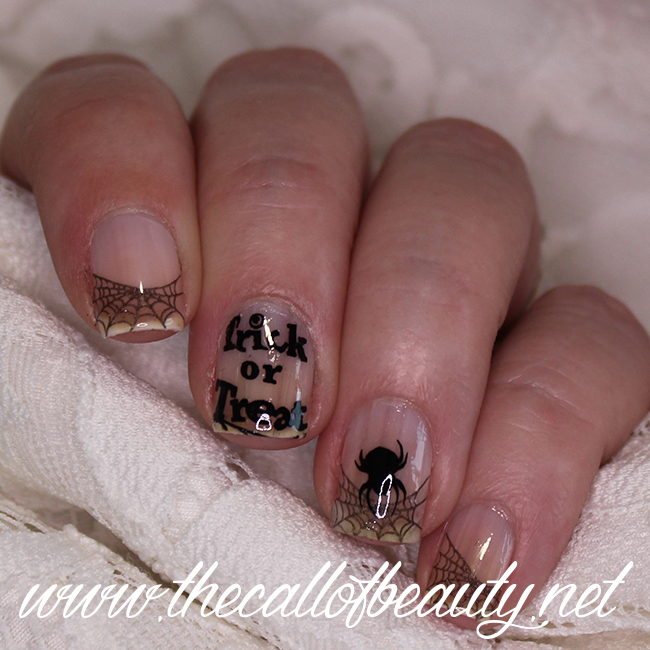
To do a negative space manicure you have to start from naked nails, I cheated and make up  my base a little with a light color, Essie Mademoiselle, just to beautify my nails.

 Halloween Spider with Negative Space

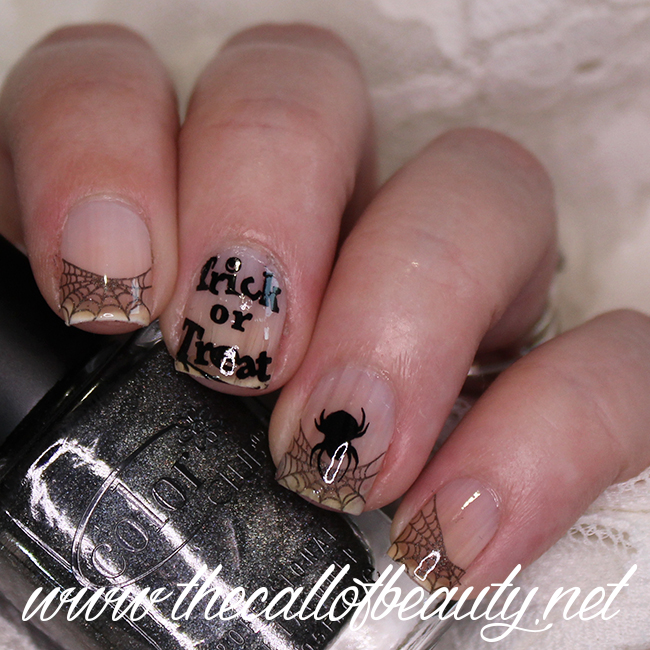
Then I stamped spider webs from Bundle Monster BM-13 on tips with a holo grey polish except for my middle finger.
On my ring finger I added the spider from the same plate in black.

On my middle finger I stamped in black the Trick or Treat words from plate Bundle Monster BM-H07.
I protected with a layer of top coat.
 Halloween Spider with Negative Space

Materials:
 Halloween Spider with Negative Space

  • Nail Polish: Essie Mademoiselle
  • Stamping polishes: Born Pretty black, Color Club Revvvolution
  • Stamping plate: Bundle Monster BM-13, Bundle Monster BM-H07
  • stamper and scraper
  • Top Coat: Seche Vite
***
 Halloween Spider with Negative Space

Il tema di oggi per il 26 Great Nail Art Ideas è una manicure per Halloween con la tecnica negative space.

Se cerchi delle idee per Halloween ne puoi trovare qualcuna a questo link, incluse idee per travestimenti!

Per fare una manicure negative space si parte dalle unghie nude, io ho imbrogliato un pò usando per la mia base un colore leggerissimo, Essie Mademoiselle, giusto per migliorare un pò le mie unghie.
Poi ho stampato delle ragnatele dal disco Bundle Monster BM-13 sulla punta delle unghie con uno smalto grigio olografico tralasciando il medio.

Sull'anulare ho aggiunto un ragno dallo stesso dischetto in nero.

Sul medio ho stampato le parole Trick or Treat dal disco Bundle Monster BM-H07.

Ho protetto tutto con uno strato di top coat.

Materiali usati:
  • Smalto: Essie Mademoiselle
  • Smalti per stamping : Born Pretty nero, Color Club Revvvolution
  • Dischi per stamping: Bundle Monster BM-13, Bundle Monster BM-H07
  • stampino e raschietto
  • Top Coat: Seche Vite


giovedì 26 ottobre 2017

Throwback Thursday #16: Tropical Manicure

Tropical Manicure

** Testo in italiano in fondo alla pagina **

One year ago I did a tropical manicure (in October, I know 😆) that I still love.

Animal print and flowers are a great match on nails!

For details about this nail art you can click on this link to see the original post.

***

Un anno fa sulle unghie avevo questa manicure tropicale (ad ottobre, lo so 😆) che mi piace ancora oggi.
 
Il maculato e i fiori sono un bell'abbinamento sulle unghie!

Per altri dettagli su questa nail art puoi cliccare questo link per andare al post originale.


martedì 24 ottobre 2017

Lip Swatch: ColourPop Ultra Satin Lip TooLips

 ColourPop Ultra Satin Lip TooLips
** Testo in italiano in fondo alla pagina **

In this post I showed you my little ColourPop haul. I bought an Ultra Satin Lip too, a liquid lipstick with satin-matte finish.

I chose TooLips that is described as a deep dark plum. It has a cool undertone and it is perfect for my pale skin.

I do love colors as mauve and plum for fall, they make me feel the change of season after summer time, when I wear fuchsia, peach and red lipsticks.

 ColourPop Ultra Satin Lip TooLips


The formula contains some emollient ingredients that help to maintain lips moisturized.

The packing is the traditional stylo for lipglosses and on the side there is the holo brand name.

 ColourPop Ultra Satin Lip TooLips


The satin-matte finish is comfortable on lips, the color is rich and you do not need layers over layers for an opaque result.

 ColourPop Ultra Satin Lip TooLips


 The application is easy thanks to the classic applicator that can reach edges too.

The texture is creamy and when it dries it is smooth on lips.

 ColourPop Ultra Satin Lip TooLips


It's not a no trasfer lipstick but it is a long wearing product, I can wear it for a dinner when I pay attention.

 ColourPop Ultra Satin Lip TooLips


Product: ColourPop Ultra Satin Lip TooLips
Price: $ 6 per 3,2 g di prodotto
Availability: sito ColourPop

***

Tra i miei acquisti ColourPop, che ti avevo mostrato in questo post, spicca un Ultra Satin Lip, un rossetto liquido dal finish satinato-opaco.

Tra i tanti colori che il brand offre io ho scelto TooLips che viene descritto come un prugna scurissimo e, avendo un sottotono freddo, sta molto bene sulla mia carnagione chiara.

Questi colori dal malva al prugna mi piacciono tantissimo per la stagione autunnale, mi fanno davvero sentire il cambio di stagione dopo i mesi estivi in cui indosso prevalentemente rossetti fucsia, pesca e rossi.

La formula contiene degli ingredienti emollienti che aiutano a mantenere le labbra idratate.

La confezione è il classico stilo per lucidalabbra che lascia intravedere il contenuto, niente di sbalorditivo ma per $ 6 non si può chiedere di più. Sul lato c'è il logo del brand olografico.

Il finish satinato opaco risulta confortevole da indossare anche per tempi prolungati, il colore è molto pigmentato e non ha bisogno di stratificazioni per risultare intenso.

La stesura è molto agevole grazie al classico applicatore che permette di coprire bene anche le parti più di precisione come gli angoli e l'arco di cupido.

La consistenza è cremosa, e da asciutto appare molto levigato sulle labbra.

Pur non essendo un prodotto no trasfer è decisamente a lunga tenuta, resiste bene diverse ore e, stando attente, si può tranquillamente indossare per una cena.

Prodotto: ColourPop Ultra Satin Lip TooLips
Prezzo: $ 6 per 3,2 g di prodotto
Distribuzione: sito ColourPop


sabato 21 ottobre 2017

Nail Crazies Unite: Rose Gold Fall Nail Art

Rose Gold Fall Nail Art
** Testo in italiano in fondo alla pagina **
 
Today prompt for Nail Crazies Unite group is vampy matte nails.

I am not a big fan of mattified manicures and when I must do matte nails I prefer to match them with a glitter polish for the accent.

Rose Gold Fall Nail Art

This time I did a falling leaves theme and I started with a beautiful fall polish, Essie Angora  Cardi.

I applyed on my ringfinger a rose gold glitter polish with a sponge for a full effect.

Rose Gold Fall Nail Art


Then I used a matt top coat on the rest of my nails.

I stamped some random leaves from an Aliexpress plate that is a copy of MoYou London Mother Nature 07. I used a rose gold foil polish  for stamping.

I add top coat only on my ringfinger to preserve the matte look of this nail art.

Rose Gold Fall Nail Art


Materials:

Rose Gold Fall Nail Art

  • Nail Polishes: Essie Angora  Cardi, China Glaze Glam
  • Nail stamping polish: Essie Penny Talk
  • Nail stamping plate: to-46 (copy of MoYou London Mother Nature 07)
  • Top Coat: Rimmel Matte Finish, Seche Vite
  • stamper and scraper
***
Rose Gold Fall Nail Art

Il tema di oggi per il gruppo Nail Crazies Unite è unghie opache e sexy.

Non sono una grande amante degli smalti opachi e se devo fare una manicure opaca preferisco sempre abbinarla a uno smalto glitter sull'accent.

Questa volta ho realizzato una nail art con foglie autunnali e sono partita da uno smalto molto adatto a questa stagione, Essie Angora  Cardi.

Sull'accent ho applicato uno smalto oro rosa usando una spugnetta per avere un effetto pieno.

Ho usato il top coat opaco sulle altre unghie.

Ho stampato delle foglie in modo casuale prendendole da un disco comprato su Aliexpress che è una copia di MoYou London Mother Nature 07. Per lo stamping ho usato uno smalto metallizzato oro rosa.

Ho applicato il top coat solo sull'anulare per preservare l'aspetto opaco di questa nail art.

Materiali usati:
  • Smalti: Essie Angora  Cardi, China Glaze Glam
  • Smalto per nail stamping: Essie Penny Talk
  • Disco per nail stamping: to-46 (copia di MoYou London Mother Nature 07)
  • Top Coat: Rimmel Matte Finish, Seche Vite
  • stampino e raschietto


giovedì 19 ottobre 2017

Throwback Thursday #15: Purple Roses Nail Art


** Testo in italiano in fondo alla pagina **

One year ago I did an elegant and feminine purple roses nail art.

I still love this nail art, I love the polish I used and the stamped pattern.

For details about this manicure click on this link to see the original post.

***

Lo scorso anno avevo sulle unghie una nail art femminile ed elegante con le rose.

Anche adesso adoro questa manicure, mi piace tantissimo lo smalto che ho usato e la fantasia stampata.

Per ulteriori dettagli su questa nail art clicca su questo link per vedere il post originale.

sabato 14 ottobre 2017

31 Day Challenge 2017 Day30: Blue Double Stamping

Blue Double Stamping
** Testo in italiano in fondo alla pagina **

Today I am doing my last manicure for 31 Day Challenge 2017, the prompt for day 30 is inspired by a tutorial.

I've already done the day 31 theme, you can see it at this link.

Blue Double Stamping
 
So I'm a finisher of the 31 Day Challenge for the third year in a row, I'm so proud of me 😂.

In 31 Day Challenge 2016 I did for the same theme this nail art, in 2015 I did this here.

I deeply love this challenge that has the same prompts every year, I can see my progress in nail art easily and I can see other lady creations and their progress too.

Blue Double Stamping

This time I took my inspiration from a tutorial by Marine Loves Polish, the link is here.

It's the double stamping technique, you have to stamp the same image two times in two different colors for a shadow look. For this technique you need a clear stamper.

This is my first time at this technique and I think I failed 😔.

I chose for my base a glittery blue polish, then I chose a sketchy pattern from MoYou London Holy Shapes 07 plate.

I stamped the pattern with a holo polish that is barely visible over the glittery base.
Blue Double Stamping

Then I stamped the same image with a white polish.

I like how it came out but the holo effect is more visible in sunshine, so this manicure resulted supershiny in the sun and a simple stamping in shade!

Materials:
Blue Double Stamping

  • Nail polish: Orly Stone Cold
  • Stamping Polishes: Born Pretty Holo H002 Magic Rainbow, Born Pretty white
  • Stamping plate: MoYou London Holy Shapes 07
  • clear stamper and scraper
  • Top Coat: Seche Vite
***
Blue Double Stamping

Oggi sono alla mia ultima manicure per il 31 Day Challenge 2017, il tema è quello del trentesimo giorno, ispirata da un tutorial.

Ho già realizzato il tema del trentunesimo giorno, lo puoi vedere a questo link.

Ho terminato per il terzo anno di fila il 31 Day Challenge, sono molto orgogliosa di me stessa 😂.

Nel 31 Day Challenge 2016per lo stesso tema ho realizzato questa nail art, nel 2015 questa qui.

Mi piace tantissimo questo challenge con gli stessi temi anno dopo anno, posso facilmente vedere i miei progressi nella nail art e mi diverte vedere le creazioni delle altre ragazze e anche i loro progressi.

Questa volta ho tratto ispirazione da un tutorial di Marine Loves Polish, il link è qui.

E' la tecnica del doppio stamping che consiste nello stampare la stessa immagine due volte in colori diversi per un risultato ombra. Per realizzarla occorre lo stampino trasparente.

Questa è la prima volta che provo questa tecnica e penso che non sia riuscita.

Come base ho scelto uno smalto blu glitterato, poi ho scelto un motivo geometrico dal disco MoYou London Holy Shapes 07.

Ho stampato la fantasia con uno smalto olografico che è poco visibile sulla base glitterata.
 
Poi ho stampato la stessa immagine con uno smalto bianco.

Mi piace come è venuta ma l'effetto olografico si vede meglio al sole diretto, quindi alla fine questa nail art è super brillante al sole e uno stamping semplice all'ombra!

Materiali usati:
  • Smalto: Orly Stone Cold
  • Smalti per stamping: Born Pretty Holo H002 Magic Rainbow, Born Pretty bianco
  • Disco per stamping: MoYou London Holy Shapes 07
  • stampino trasparente e raschietto
  • Top Coat: Seche Vite


domenica 8 ottobre 2017

31 Day Challenge 2017 Day31 - Nail Crazies Unite: Sugar Skull Nails

Sugar Skull Nails
** Testo in italiano in fondo alla pagina **

For day 31 of 31 Day Challenge 2017 the prompt is honor nails you love.

Sugar Skull Nails

This is a wide theme and it means you can recreate a manicure you loved. In this case I am doing again my sugar skull manicure that I did last Valentine's Day, you can find it at this link.

It is one of most loved nails from readers of this blog (it is the most read blog post!).

Sugar Skull Nails

I know I've skipped the day 30 prompt, I will do it tomorrow, I promise!

In 31 Day Challenge 2016 I did this nail art, in 2015 this here.

Sugar Skull Nails


Luckily it fits for Nail Crazies Unite group theme of the week too, that is sugar skull, so one manicure for two challenges!

I started from a deep purple base, then I stamped with a pink holo polish the roses pattern from Born Pretty BP-73 plate.

On my ring finger I applyed a decal with sugar skull, so scary and cute!
 
I protected with a layer of top coat.

I love how this manicure is in the sunshine, see the pic below!
Sugar Skull Nails


Materials:
Sugar Skull Nails

  • Nail polish: OPI Turn On the Northern Lights
  • Nail stamping polish: Born Pretty Holo H004 Magnificent Time
  • Nail stamping plate: Born Pretty BP-73
  • Decals: STZ-452
  • Top Coat: Seche Vite
  • water bowl
  • tweezers
  • stamper and scraper
***
Sugar Skull Nails

Per il trentunesimo giorno del 31 Day Challenge 2017 il tema è onora una nail art che ami.

Questo tema è molto ampio e significa che si possono ricreare maicure che ci sono piaciute.

Nel mio caso ho fatto per la seconda volta la mia manicure sugar skull che avevo realizzato lo scorso San Valentino, la trovi a questo link.

E' una delle nail art più amate dai lettori di questo blog (infatti è il post più letto!).

So che ho saltato il tema del trentesimo giorno, lo farò domani, promesso!

Nel 31 Day Challenge 2016 realizzai questa nail art, nel 2015 quest'altra.

Fortunatamente questa manicure va bene anche per il tema di questa settimana del gruppo Nail Crazies Unite che è proprio sugar skull, quindi una manicure per due challenge!

Sono partita da una base viola scuro e ho stampato in rosa olografico le rose dal disco Born Pretty BP-73.

Sull'anulare ho applicato una decalcomania con lo sugar skull, così bello e terrificante!

Ho protetto tutto con uno strato di top coat.

Adoro questa nail art al sole, guarda l'ultima foto!

Materiali usati:
  • Smalto: OPI Turn On the Northern Lights
  • Smalto per stamping: Born Pretty Holo H004 Magnificent Time
  • Disco per stamping: Born Pretty BP-73
  • Decalcomanie: STZ-452
  • Top Coat: Seche Vite
  • acqua
  • pinzette
  • stampino e raschietto


venerdì 6 ottobre 2017

31 Day Challenge 2017 Day29: Wonder Woman Nail Art

Wonder Woman Nail Art
** Testo in italiano in fondo alla pagina **

For day 29 of 31 Day Challenge 2017 the prompt is inspired by supernatural.

This is a theme that always upsets me!

Wonder Woman Nail Art

For this theme you can see my 31 Day Challenge 2016 nail art here, and the 2015 here.

This year I realized a superhero manicure with Wonder Woman, she is the star of 2017 action movies.

Wonder Woman Nail Art


Unfortunately the decal I chose was not of good quality but just a piece of plastic.

I had so many difficulty applying it and I soon removed it after pics.

Wonder Woman Nail Art
 
I paired this theme with a brand new polish from Iceland collection from OPI, Turn on the Northern Lights. I am deeply in love with this purple polish with pink shimmer!

Materials:

Wonder Woman Nail Art

  • Nail Polish: OPI Turn on the Northern Lights
  • Water Decals: STZ-185
  • water bowl
  • tweezers
  • Top Coat: Seche Vite 
***
Wonder Woman Nail Art

Per il  ventinovesimo giorno del 31 Day Challenge 2017 il tema proposto è ispirata al sovrannaturale.
Questo tema mi manda sempre in paranoia!

Puoi vedere la mia nail art realizzata per il 31 Day Challenge 2016 qui, e quella per il 2015 qui.

Quest'anno ho realizzato una nail art con un supereroe, Wonder Woman, la star dei film d'azione del 2017.

Sfortunatamente la decalcomania che ho scelto non era di buona qualità ma solo un pezzo di plastica.

Ho avuto parecchie difficoltà per applicarle e le ho rimosse subito dopo le foto.

A questo tema ho abbinato un nuovo smalto della collezione OPI Iceland, si chiama Turn on the Northern Lights. Adoro pazzamente questo smalto viola con riflessi rosa!

Materiali usati:
  • Smalto: OPI Turn on the Northern Lights
  • Decalcomanie: STZ-185
  • acqua
  • pinzette
  • Top Coat: Seche Vite