martedì 28 febbraio 2017

Twinsie Tuesday: Sparkly Lines

Nail Art: Sparkly Lines
** English text at bottom page **

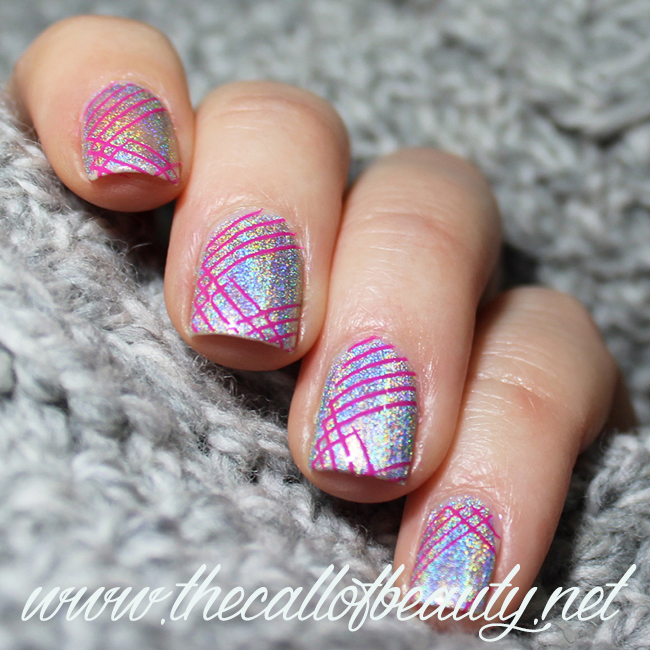
Il tema per oggi per il gruppo Twinsie Tuesday è scintillante.

Quando ho cominciato a pensare a che tipo di nail art fare ho subito scelto di usare lo smalto olografico di Born Pretty, mi piace veramente tanto e l'ho già usato in questa nail art come base e qui e qui come smalto per stamping.

Nail Art:  Sparkly Lines


Questa volta ho deciso di esaltare l'arcobaleno olografico accostandolo a uno stamping semplice, delle linee grafiche prese dal disco MoYou London Holo Shape 07 e stampate in fucsia.

nail stamping plate

Ho indossato questa nail art per circa una settimana e mi è piaciuta veramente molto, a volte anche per me less is more!

Se vuoi fare acquisti sul sito Born Pretty ti ricordo il mio codice CBLL91 per ricevere uno sconto del 10%.

Nail Art: Sparkly Lines


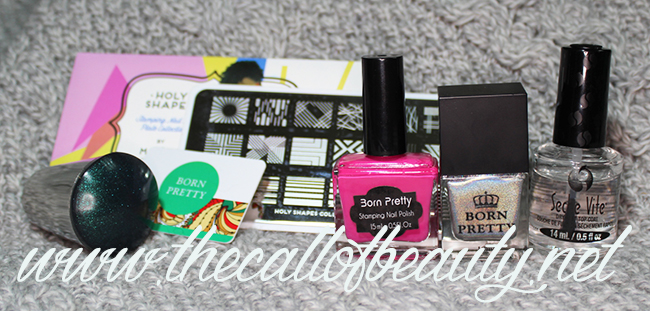
Materiali usati:

Nail Art: Sparkly Lines

  • Smalto: Born Pretty Holo #H002 Magic Rainbow
  • Smalto per stamping: Born Pretty #21
  • Disco per stamping: MoYou London Holo Shape 07
  • Top coat: Seche Vite
  • stampino e raschietto: Born Pretty 
***
Nail Art: Sparkly Lines

Today theme for Twinsie Tuesday group is sparkle.

When I started thinking of  this nail art I immediately chose the holo polish from Born Pretty, I really like it and I used it before as my base in this nail art and here and here as stamping polish.

This time I decided to exalt the holo rainbow matching with a simple stamping, just some graphic lines from MoYou London Holo Shape 07 plate that I stamped in fuchsia.

I wore this nail art for almost a week and I liked very much, sometimesless is more for me too!

If you are shopping on Born Pretty Store you can use my code CBLL91 for a 10% off.

Materials:
  • Nail Polish: Born Pretty Holo #H002 Magic Rainbow
  • Stamping polish: Born Pretty #21
  • Stamping plate: MoYou London Holo Shape 07
  • Top coat: Seche Vite
  • stamper and scraper: Born Pretty


venerdì 24 febbraio 2017

Nail Crazies Unite: Red & Black Leopard Mani

Red & Black Leopard Mani
** English text at bottom page **

Il tema stabilito per oggi dal gruppo Nail Crazies Unite è rosso e nero.

Non sono amante dello smalto rosso e ne possiedo pochi rispetto ad altri colori (ad esempio il verde!).

Red & Black Leopard Mani

L'abbinamento con il nero è un classico, infatti possiedo una sciarpa infinity in questa combinazione di colori e alla quale mi sono ispirata.

Per la mia manicure leopardata in rosso e nero ho creato una base sfumata semplicente applicando i due smalti con una spugnetta per farli fondere in un bel gradiente.

Red & Black Leopard Mani


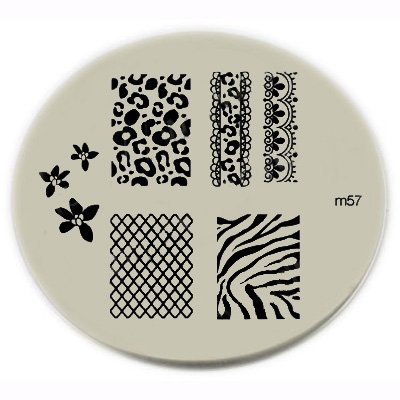
Dopo aver fatto asciugare la base ho stampato in nero il mio motivo leopardato preferito da uno dei miei più vecchi dischi per nail stamping, il Konad m57. Avevo usato questo disco anche in questa nail art.


Ho protetto questa nail art con una passata di top coat.

Red & Black Leopard Mani


Materiali usati:

Red & Black Leopard Mani

  • Smalti: Layla Gel Effect n.6, Kiko Gel Perfect Duo 684 Black
  • Smalto per stamping: Born Pretty nero
  • Disco per stamping: Konad m57
  • Top Coat: Kiko Gel Perfect Duo
  • stampino e raschietto: Born Pretty
***
 Red & Black Leopard Mani

Today theme for Nail Crazies Unite group is red and black.

I am not a red polish lover and I own a few compared to other colors, for example green!

The combination with black is a classic, indeed I own an infinity scarf with this colors and I took my inspiration from that.

For my Red & Black Leopard Mani I created a gradient base just applying the two polishes with a sponge to achieve a nice blended look.

When the base was dried I stamped in black the leopard pattern from Konad m57 plate, that is one of my favorite and older plate.
I used this plate before in this nail art.

I protected this nail art with a layer of top coat.

Materials:
  • Nail polishes: Layla Gel Effect n.6, Kiko Gel Perfect Duo 684 Black
  • Stamping polish: Born Pretty black
  • Stamping plate: Konad m57
  • Top Coat: Kiko Gel Perfect Duo
  • stamper and scraper: Born Pretty

Disclaimer: stamper and scraper were provided from PR for review, other items were bought by me


mercoledì 22 febbraio 2017

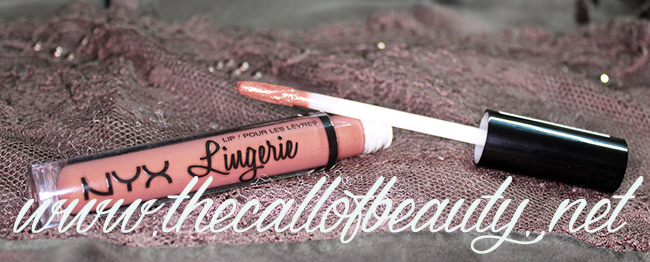
Lip Swatch: NYX Lingerie #10 Teddy

Lip Swatch: NYX Lingerie #10 Teddy
** English text at bottom page **

In questo inverno che sembra non abbandonarci continua la mia ricerca di rossetti opachi dai toni marroni, se te li sei persi puoi trovare lo swatch del mio primo Lippie Stix ColourPop qui e del mio primo rossetto opaco metallizzato di Gerard Cosmetic qui.

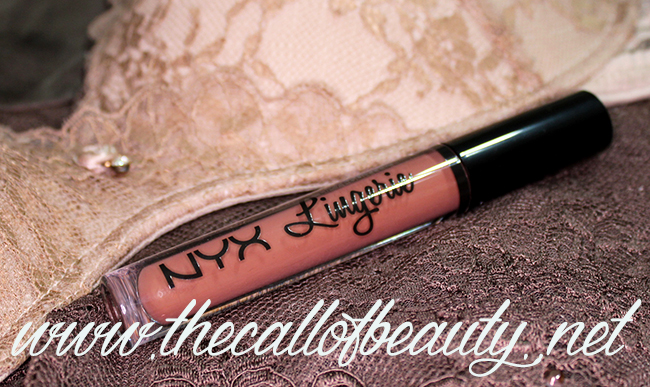
Ho fatto acquisti da un sito spagnolo e ho comprato il mio primo rossetto liquido della serie NYX Lingerie: #10 Teddy.

La palette dei colori proposta dalla linea NYX Lingerie varia dai toni del nude e rosati amarroni e tortora all'anima dark. Dopo anni di uso quasi esclusivo sono stufa di indossare colori nudi che mi cancellano le labbra e non le esaltano, quindi ho scelto un colore più deciso.

Teddy è un rossetto liquido marrone medio freddo.

Lip Swatch: NYX Lingerie #10 Teddy


La confezione ricorda quella dei gloss NYX: tubo trasparente e tappo nero, non particolarmente lussuosa o speciale ma comoda per individuare subito il colore del contenuto.

Il finish è completamente opaco e proprio per questo tende a seccare le labbra dopo qualche ora. Per evitare che le labbra 'tirino' e si evidenzino le pellicine faccio uno scrub e un impacco di burro per labbra prima di indossarlo.

Lip Swatch: NYX Lingerie #10 Teddy

L'applicatore è il tradizionale da gloss ma la punta piuttosto lunga e permette di coprire bene la superficie delle labbra e gli angoli.

Durante l'applicazione la consistenza è morbida e il prodotto può essere distribuito agevolmente. Asciuga molto velocemente e si fissa bene senza scivolare nelle pieghette.

Lip Swatch: NYX Lingerie #10 Teddy


Il profumo che emana è stucchevole ma per fortuna scompare nel giro di pochi attimi.

La durata è buona, io arrivo tranquillamente alla fine della mia giornata lavorativa senza che si sposti o che lasci aloni vuoti.

Se la gamma dei colori fosse ampliata ne comprerei sicuramente un altro.

Prodotto: NYX Lingerie #10 Teddy
Prezzo: € 7,90 per 4 ml di prodotto
Disponibilità: negozi NYX e online

***

This winter I am spending my time finding the right matte brown lipstick, you can find my swatch of my very first Lippie Stix ColourPop here and of my first metal matte Gerard Cosmetic here.

This time I bought my first NYX Lingerie lipstick at a spanish make up on line store: #10 Teddy.

NYX Lingerie has nude and rosy tones and some darkest color, like taupe and brown.

After years I am sick of nude lipsticks that erase my lips and I chose a dark color.

Teddy is a medium cool brown.

The packing is similar to NYX glosses: clear plastic tube and black cap, nothing fancy but useful when you must catch the right shade.

The finish is completely matte and it dries a bit. To evoid dryness I always have a lip scrub and a lip butter mask before applying this lipstick.

The applicator is the gloss type but the tip is longer and you can easily do the edges.

The application is easy and the texture is creamy.

It dries quickly and it stays in place.

The scent is fake but fortunately it vanishes in few moments.

The wearing time is good, it stays for all my working day.

I will buy more if the color range will be extended.

Product: NYX Lingerie #10 Teddy
Price: € 7,90 for 4 ml in Europe
Availability: NYX corner and online


lunedì 20 febbraio 2017

Nail Challenge Collaborative: Holo Snowflakes and a Husky - A New Beginning #2

Holo Snowflakes and a Husky
** English text at bottom page **

Nel mese di febbraio il gruppo Nail Challenge Collaborative ha come tema un nuovo inizio.
Il tema è vastissimo e permette di esprimersi in tante maniere diverse.

Holo Snowflakes and a Husky


Per la mia seconda manicure per il tema nuovo inizio (trovi la mia prima entry a questo link) ho scelto di usare diverse cosette nuove.

Per prima cosa ho usato uno smalto semipermanente blu opaco, era tantissimo che non usavo il semipermanente e questo colore elegante e dal finish vellutato è davvero perfetto per l'inverno.

Holo Snowflakes and a Husky

Poi per la prima volta ho usato il mio amato disco MoYou London Festive Collection 02 per creare dei fiocchi di neve olografici! Ho usato lo smalto olografico Born Pretty che avevo già usato per questa manicure, è fantastico per lo stamping!

 
Per creare il mio accent ho stampato sull'anulare dal disco Harunouta L-016 l'husky con lo smalto per stamping bianco. Trovi il disco a questo link.


Per stampare ho usato lo stampino gigante glitterato che è appiccicoso e stampa benissimo.

Ho provato anche la versione lucida di questa nail art semplicemente applicando il Seche Vite, non volevo infatti sigillare con il top semipermanente per poter cambiare la nail art.

Holo Snowflakes  and a Husky


Puoi trovare lo smalto olografico, il disco Harunouta e lo stampino glitter sul sito Born Pretty Store. Ti ricordo che puoi usare il mio codice CBLL91 per avere un 10% di sconto.

Holo Snowflakes and a Husky


Materiali usati:

Holo Snowflakes  and a Husky

Holo Snowflakes and a Husky

*** 
 Holo Snowflakes and a Husky

On February Nail Challenge Collaborative group has the theme a new beginning.

This theme is wide and you can interpret in several ways.

My second manicure for this prompt (you can find the first one at this link) I chose new items to use.

First of all I used a matte blue gel polish. It was so long that I used a gel polish and this is perfect for winter, elegant and velvety.

Then I used for the first time my beloved MoYou London Festive Collection 02 to create holo snowflakes! I used the holo polish from Born Pretty that I used for this manicure too, it's amazing for stamping!

To create an accent I stamped on my ringfinger in white the siberian husky from Harunouta L-016 plate, you can find it here.

I stamped with the starry stamper that is so sticky and stamp smoothly.

I tryed the glossy version of this manicure too simply applying Seche Vite  because I didn't want to seal my design to have the chance to do a new nail art.

You can find the holo polish, the Harunouta plate and the starry stamper on Born Pretty Store.

I remember you that you can use my code CBLL91 at checkout for 10% off.

Materials:

venerdì 17 febbraio 2017

26 Great Nail Art Ideas: Blue Floral

Great Nail Art Ideas: Blue Floral
** English text at bottom page **

Il tema proposto per oggi nel gruppo Crumpet's Nail Tarts è manicure floreale in blu.

Great Nail Art Ideas: Blue Floral

Questo tema è uno dei miei preferiti e ho già realizzato diverse volte i miei fiori in blu, puoi dare uno sguardo qui, qui e anche qui.

Strano a dirsi, poi nella realtà non amo i fiori blu!

Great Nail Art Ideas: Blue Floral

Ho usato delle rose blu water decal in combinazione con la tecnica dello stamping.

Per far risaltare le decal sono partita da una base bianca su cui ho stampato in blu i pois dal disco QA57. 3
nail plate

Ho sciolto le decal in acqua e le ho applicate in maniera asimmetrica sulle unghie.

Infine una passata di top coat ha protetto la decorazione.

Great Nail Art Ideas: Blue Floral


Materiali usati:

Great Nail Art Ideas: Blue Floral

  • Smalto: China Glaze Snow
  • Smalto per stamping: Konad blu
  • Disco per stamping: QA57
  • Water decal: A286
  • Top Coat: Seche Vite
  • stampino e raschietto
Great Nail Art Ideas: Blue Floral

***
Great Nail Art Ideas: Blue Floral 
 
Today theme for Crumpet's Nail Tarts is blue floral.

I really like thise theme and I realized several manicures with blue flowers, you can see here, here and here.
 
Strange to say I dislike blue flowers in real life!

I used some blue roses water decals combined with stamping.

To make decals pop I started with a white base and I stamped in blue some dots from QA57 plate.

I melted decals in water and then I applied them randomly on nails.

I protected my manicure with a layer of top coat.

Materials:
  • Nail polish: China Glaze Snow
  • Stamping polish: Konad blue
  • Stamping plate: QA57
  • Water decals: A286
  • Top Coat: Seche Vite
  • stamper and scraper

giovedì 16 febbraio 2017

Make Up of the Day: ColourPop Nillionaire

Make Up of the Day: ColourPop Nillionaire
** English text at bottom page **

Ti avevo mostrato in questo post il mio primo haul ColourPop.

Ho iniziato a usare tutti i prodotti che ho acquistato, puoi vedere qui lo swatch del Lippie Stix.

Make Up of the Day: ColourPop Nillionaire

Gli ombretti mi piacciono molto, li applico sia con i pennelli che con i polpastrelli per un risultato intenso.

Ho realizzato questo make up sfumando uno degli ombretti opachi, Mittens, nella piega e applicando quello metallico, Nillionaire, al centro della palpebra.

Materiali usati: 
  • Ombretti: ColourPop Mittens e Nillionaire, Mac Brulè
  • Eyeliner: Mac Blacktrack
  • Mascara: Rimmel London Scandal'Eyes
***

I showed you in this post my very first ColourPop Haul.

I started using those products, you can see my Lippie Stix swatch here.

I really like the eyeshadows, I apply them with brushes and fingertips for an intense coverage.

I did this make up just blending a matte shadows, Mittens, in the crease with a metallic one, Nillionanire, that I applyed on the lid.

Materials: 
  • Eyeshadows: ColourPop Mittens and Nillionaire, Mac Brulè
  • Eyeliner: Mac Blacktrack
  • Mascara: Rimmel London Scandal'Eyes


martedì 14 febbraio 2017

Twinsie Tuesday: V-day Manicure 2017 - Inspired by the Season

V-day Manicure 2017
** English text at bottom page **

Il tema di oggi per il gruppo delle Twinsie Tuesday è ispirato dalla stagione, oggi è san Valentino ed io ne ho approfittato per fare la mia manicure romantica per celebrarlo.

V-day Manicure 2017

Naturalmente il colore per la base che ho scelto è rosso glitter, lo avevo già usato in questa nail art. Fa parte di una vecchia collezione natalizia di OPI ma va benissimo anche in questa occasione.

V-day Manicure 2017


Ho completato la manicure con una cascata di cuoricini e la scritta 'buon San Valentino' in bianco dal disco MoYou London Festive 20, lo avevo usato anche per la mia manicure di San Valentino dello scorso anno, la trovi a questo link.

stamping plate


Ho protetto la mia manicure con una passata di top coat.

V-day Manicure 2017


Materiali usati:

V-day Manicure 2017

  • Smalto: OPI Speak for your Elf
  • Smalto per stamping: Born Pretty bianco (dimenticato in foto)
  • Disco per stamping: MoYou London Festive 20
  • Top Coat: Seche Vite
  • stampino e raschietto
***
V-day Manicure 2017
Today theme for Twinsie Tuesday group is inspired by the season. Today it is Valentine's Day so I decided to do my romantic manicure to celebrate.

The color I chose for my base is glitter red, it is from an old OPI Christmas collection that is perfect in this occasion. I used it before in this nail art.

I completed my manicure with a hearts fall and the lettering Happy Valentine's Day in white from MoYou London Festive 20 plate that I used here before.

I protected my nail art with a layer of top coat.

Materials:
  • Nail Polish: OPI Speak for your Elf
  • Stamping polish: Born Pretty white (not displayed)
  • Stamping plate: MoYou London Festive 20
  • Top Coat: Seche Vite
  • stamper and scraper